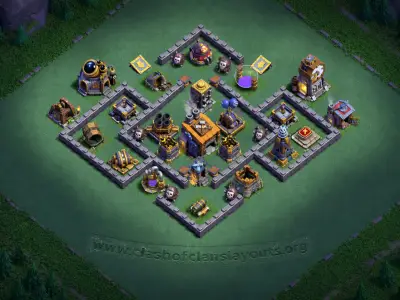
COC Bases: BH8 All Layouts (Builder Hall 8 Base Designs)
All Builder Hall 8 layouts in one place — defense, farming, trophy pushing, and balanced Builder Base designs for high-level Builder Base battles.
Builder Hall 8 Base Layout Guide
Builder Hall 8 introduces a major change to two-stage Builder Base attacks:
the Battle Copter. Attackers can now choose between the ground-based Battle
Machine and the long-range flying Battle Copter, making defensive planning
more complex than it was at BH7.
A strong BH8 base layout must prepare for ground and air Hero
Machines, powerful troop combinations, and attacks that change strategy between
Stage 1 and Stage 2. The layout should protect important defenses, deny safe
long-range attacks, and prevent surviving troops from receiving an easy route
toward the Builder Hall or O.T.T.O’s Outpost.
BH8 Defense Layouts
BH8 defense layouts use protected anti-air coverage, controlled ground paths, and carefully divided defensive strength across both stages. They are designed to pressure the selected Hero Machine while preventing supporting troops from clearing valuable buildings safely.
BH8 Trophy Layouts
BH8 trophy layouts aim to reduce the attacker’s total stars and destruction across both stages. A demanding Stage 1 should weaken the starting army, while Stage 2 should prevent the surviving troops, reinforcements, and Hero Machine from earning easy additional stars.
BH8 Progression Layouts
Builder Base attackers do not steal the resources stored in your buildings. Builder Gold is earned through attacks, while Builder Elixir is earned from defensive results. Progression layouts therefore focus on limiting enemy stars and destruction while your defenses, troops, walls, and Hero Machines are upgraded.
BH8 Balanced Layouts
Balanced BH8 layouts prepare for both ground and air attacks without depending entirely on one defense or one stage. They combine protected objectives, anti-air coverage, ground pathing, and enough second-stage strength to challenge attackers who complete Stage 1.
What Makes Builder Hall 8 Different?
Builder Hall 8 changes how attackers approach both stages because they are no longer limited to the Battle Machine. The Battle Copter attacks from the air and at long range, allowing it to avoid walls and target buildings from positions that a ground Hero Machine cannot use.
Attackers may also select a different Hero Machine before beginning Stage 2. A player can use the Battle Machine to break through ground defenses in Stage 1 and then switch to a full-health Battle Copter for Stage 2. This means both stages must be capable of handling different Hero and troop combinations.
Battle Copter Unlocks
The Battle Copter is a flying, long-range Hero Machine that can attack both ground and air targets. Its range may allow it to damage exposed buildings without immediately entering the coverage of nearby defenses.
Hero Machine Switching
Attackers can choose either Hero Machine for Stage 1. Before Stage 2, they may continue with the surviving Hero Machine or switch to the other one at full health. Each stage should therefore be prepared for a different Hero approach.
Mega Tesla Defense
The Mega Tesla adds powerful electrical damage to BH8 defense. Its placement should protect an important route or objective while remaining difficult to remove from the edge. Nearby buildings should keep attackers inside its range rather than providing a safe approach.
More Advanced Attack Planning
BH8 attackers can build one plan for Stage 1 and a different plan for Stage 2. Your two stages should not share the same obvious weakness, because attackers may switch troops, reinforcements, and Hero Machines after clearing the first area.
How to Defend Against the Battle Copter
The Battle Copter’s long attack range makes exposed defenses and poorly covered buildings easier to target. A BH8 layout should avoid giving it a safe position where it can repeatedly damage buildings while remaining outside the range of most defenses.
Walls do not stop the Battle Copter, so anti-air planning must depend on defensive ranges, protected buildings, and the route created by target placement. Review both stages from the air rather than judging them only by their wall compartments.
Protect Air-Targeting Defenses
Avoid placing important air-targeting defenses directly beside the deployment edge. Use supporting buildings and overlapping ranges so the Battle Copter must enter defensive coverage before it can remove them.
Remove Safe Long-Range Positions
Inspect whether the Battle Copter can attack an important defense from behind an outer building or from an area covered by only one defense. Adjust building spacing so it must move closer to the main defensive area.
Use Overlapping Air Coverage
Important air routes should be covered by more than one defense whenever possible. Overlapping coverage prevents the Battle Copter from removing a single defense and then operating safely in that entire section.
Avoid One Air-Safe Side
Check every deployment side for a route with limited air resistance. One weak side may allow the Battle Copter and supporting flying troops to approach the Builder Hall or Outpost without receiving enough early damage.
Battle Machine and Battle Copter Defense
BH8 layouts must defend two very different Hero Machines. The Battle Machine follows ground paths, interacts with walls, and can absorb substantial defensive damage. The Battle Copter ignores walls, attacks from range, and may approach important targets from unexpected angles.
Against the Battle Machine
Use walls, compartments, and building placement to prevent a direct ground route through several important defenses. Guide the Battle Machine toward overlapping fire and avoid giving it a safe sequence of outside targets.
Against the Battle Copter
Protect air-targeting defenses and remove positions from which the Battle Copter can attack without meaningful retaliation. Its approach should lead toward several defensive ranges rather than an isolated target.
How to Place the Mega Tesla at BH8
The Mega Tesla should support the overall plan of the stage where it is placed. Do not position it only because the center looks visually secure. Consider which troops and Hero Machines are likely to enter its range and whether attackers can remove it safely before it deals meaningful damage.
Its stage placement should respond to your defensive results. Stage 1 placement may help weaken the attacker’s complete starting army, while Stage 2 placement may create a difficult final obstacle for surviving troops and a newly selected Hero Machine.
Place It in Stage 1 When
Consider Stage 1 when attackers regularly reach the second stage with several troops and a healthy Hero Machine. Protect the Mega Tesla behind other buildings so it can deal damage before attackers reach and destroy it.
Place It in Stage 2 When
Consider Stage 2 when attackers clear the first stage with limited strength but still earn easy additional stars. The Mega Tesla can pressure surviving troops or a freshly selected Hero Machine near O.T.T.O’s Outpost.
Protect It from Edge Access
Avoid placing the Mega Tesla where ranged troops or a Hero Machine can attack it immediately. Place enough structures and defensive coverage around it to make early removal costly.
Avoid Excessive Grouped Value
Do not surround the Mega Tesla with every other important defense. One successful entry or area-damage ability should not provide access to several of your strongest buildings at the same time.
Balancing Stage 1 and Stage 2 at BH8
The addition of a second Hero Machine makes stage balance more important. An attacker who struggles through Stage 1 may switch to a full-health alternative Hero Machine before Stage 2. A weak second stage can therefore be cleared even when the original Hero Machine was heavily damaged.
Both stages need a clear purpose. Stage 1 should weaken the starting army and force ability usage. Stage 2 should apply immediate pressure, protect the Outpost, and remain effective against a potentially different Hero Machine and troop selection.
Stage 1: Force Difficult Choices
Make attackers decide between removing dangerous defenses, protecting their Hero Machine, and preserving troops for Stage 2. Avoid one entry route that provides access to the Builder Hall and several important defenses together.
Stage 2: Prepare for a Fresh Hero
Stage 2 may face a full-health Hero Machine even when the attacker’s original Hero was nearly defeated. Use strong opening coverage so the newly selected Hero cannot begin with several safe targets.
BH8 Stage 1 Layout Priorities
Stage 1 faces the attacker’s full starting army and chosen Hero Machine. It should protect the Builder Hall, deny easy percentage, and force the attacker to use important abilities before achieving complete destruction.
Protect Ground and Air Entries
Ground armies and air armies may select completely different entry sides. Review the layout for direct ground routes as well as air approaches that bypass walls and avoid most defensive coverage.
Force Hero Ability Usage
Apply enough early pressure to encourage the attacker to activate the Hero Machine’s ability during Stage 1. An attacker entering Stage 2 with fewer tactical options is easier to contain.
Limit Safe Percentage
Outside buildings should influence troop movement or consume time while remaining close enough to defensive coverage. Avoid offering several buildings that can be destroyed without placing troops or the Hero Machine at risk.
Separate Important Targets
The Builder Hall, Mega Tesla, Giant Cannon, and key air defenses should not all be reachable through one successful entry. Force attackers to move between multiple defended sections of the stage.
BH8 Stage 2 Layout Priorities
Stage 2 must prepare for surviving troops, reinforcements, and either Hero Machine. Attackers can adjust their strategy before deployment, so the stage should not depend entirely on stopping one predictable army composition.
Protect O.T.T.O’s Outpost
Place the Outpost where attackers must enter useful defensive coverage to reach it. Avoid exposing it near the deployment edge or aligning it with several other valuable buildings along one direct route.
Pressure the Opening Deployment
Do not give the surviving army several free targets at the beginning of Stage 2. Use defenses and supporting structures to apply pressure before attackers establish a safe funnel toward the Outpost.
Prepare for Hero Switching
Assume the attacker may select the Hero Machine that best counters Stage 2. Include both useful ground control and protected anti-air coverage so neither Hero receives a completely safe approach.
Prepare for Reinforcements
Reinforcement troops can correct a weakness in the surviving army. Use mixed defensive coverage and protected objectives so one reinforcement selection does not provide an easy answer to the complete stage.
Choosing the Right BH8 Layout
Select a BH8 layout according to your complete defensive replays. Identify which Hero Machine attackers choose, whether they switch Heroes before Stage 2, which defenses they remove first, and how much army strength survives the first stage.
A layout that performs well against the Battle Machine may still provide the Battle Copter with safe long-range targets. Similarly, strong anti-air placement may not compensate for a direct ground route through the core. Choose a layout that addresses the attack pattern you encounter most often.
Choose Stronger Anti-Air Coverage When
Improve air coverage when the Battle Copter or flying troops repeatedly avoid defensive fire. Protect air-targeting defenses, remove safe long-range positions, and strengthen weak air approaches on both stages.
Choose Stronger Ground Control When
Improve ground pathing when the Battle Machine or heavy ground troops repeatedly follow the same route. Adjust walls, compartments, Giant Cannon coverage, and defensive overlap along that path.
How to Use BH8 Copy Links
Tap an available copy link to open the selected BH8 layout directly in Clash of Clans. Review both stages in the Layout Editor before saving or activating the base. Confirm that all required buildings, defenses, walls, traps, and Stage 2 structures are placed correctly.
After copying a layout, compare its defensive distribution with your own upgrade levels. You can move eligible defenses between stages, adjust trap positions, change wall openings, and relocate outside buildings according to the weaknesses shown in your defense log.
BH8 Two-Stage Layout Checklist
- Check Battle Copter approaches: remove safe positions from which it can damage important buildings outside most defensive ranges.
- Check Battle Machine routes: avoid a direct ground path through several valuable defenses or objectives.
- Protect anti-air defenses: do not expose important air-targeting buildings near an easy deployment edge.
- Review Mega Tesla placement: make sure it protects an important route without being easy to remove or grouped with every valuable defense.
- Prepare both stages for Hero switching: Stage 2 should remain useful against either a fresh Battle Machine or a fresh Battle Copter.
- Balance defensive strength: avoid placing nearly every strong defense in one stage while leaving easy stars in the other.
- Protect both objectives: neither the Builder Hall nor O.T.T.O’s Outpost should be directly accessible from the deployment edge.
- Inspect reinforcement matchups: Stage 2 should contain enough mixed coverage to challenge more than one troop type.
- Place traps on predicted paths: use walls and building targets to guide troops toward trap locations.
Common BH8 Base-Building Mistakes
- Designing only for the Battle Machine: walls and ground traps do not prevent the Battle Copter from approaching through the air.
- Exposing air defenses: unprotected air-targeting buildings may be removed before they can pressure the Battle Copter.
- Leaving long-range safe zones: outer building placement may allow the Battle Copter to attack without entering enough defensive ranges.
- Ignoring Hero switching: Stage 2 may face a fresh Hero Machine even when Stage 1 nearly defeated the attacker’s original Hero.
- Grouping the Mega Tesla with every key defense: one successful entry may provide too much defensive value to the attacker.
- Using the same weakness on both stages: attackers can change their army plan before entering Stage 2.
- Making Stage 2 an afterthought: leftover buildings do not create a complete defensive plan around O.T.T.O’s Outpost.
- Changing layouts after one defense: one strong attack does not prove that the complete design is ineffective.
Tips for Builder Hall 8 Progress
- Track Hero Machine choices: note whether attackers prefer the Battle Machine, Battle Copter, or a Hero switch between stages.
- Review air and ground replays separately: each attack type may expose a different weakness in the layout.
- Protect Stage 2 from fresh Heroes: apply defensive pressure immediately so a newly selected Hero Machine cannot begin with safe targets.
- Test Mega Tesla placement: move it when attackers repeatedly remove it early or avoid the area it is intended to protect.
- Change one weakness at a time: small adjustments make it easier to identify which modification improved the defensive result.
- Upgrade both Hero Machines: stronger Hero options improve your own ability to adapt between Stage 1 and Stage 2 attacks.
- Balance defensive upgrades: useful pathing performs better when both stages contain defenses capable of dealing meaningful damage.
When Should You Change Your BH8 Layout?
Consider adjusting your BH8 layout when several attackers use the same Hero Machine, approach through the same side, remove the same anti-air defense first, or switch Heroes before Stage 2 to exploit the same weakness. Repeated success from one route usually indicates a problem with defensive coverage or target placement.
Begin by changing the affected area rather than replacing both stages immediately. Move an air defense, adjust a wall opening, relocate an outside building, change a trap position, or move the Mega Tesla between stages. Review several new defenses before deciding whether the complete layout needs to be replaced.
Explore the layouts on this page to choose a BH8 base layout suited to two-stage defense, trophy pushing, or regular progression. After activating a new Builder Hall 8 Clash of Clans base, compare its performance against the Battle Machine and Battle Copter, then adjust the stage that repeatedly gives attackers the easiest route to additional stars.
