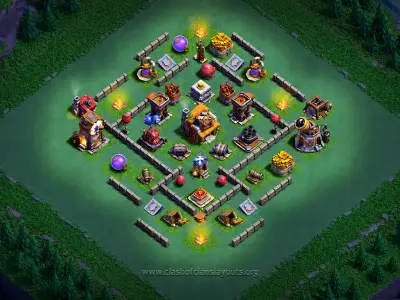
COC Bases: BH5 All Layouts (Builder Hall 5 Base Designs)
All Builder Hall 5 layouts in one place — defense, farming, trophy pushing, and balanced Builder Base designs to help you win more battles.
Builder Hall 5 Base Layout Guide
Builder Hall 5 is an important turning point in Builder Base progression.
Attackers can now use the Battle Machine alongside their regular troops,
which makes weak entry routes and exposed defenses easier to punish.
A strong BH5 base layout should control the Battle Machine’s
movement, protect important defenses, and prevent the attacking army from
moving directly through the center of the base.
BH5 is also the final Builder Hall level fought on one defensive stage.
Since attackers can commit their complete army and Hero Machine to a single
compact area, your defenses, walls, traps, and surrounding buildings must
work together. A well-organized layout can help limit stars and destruction,
reduce trophy losses, and improve your defensive Builder Elixir rewards.
BH5 Defense Layouts
BH5 defense layouts focus on protecting important defenses from early removal while keeping attackers under fire for longer. Walls and outside buildings should guide troops and the Battle Machine toward areas where multiple defenses can target them at the same time.
BH5 Trophy Layouts
BH5 trophy layouts are designed to make stars and high destruction more difficult to achieve. They protect likely entry routes, avoid exposing the Builder Hall, and force attackers to spend additional time moving between important sections of the base.
BH5 Progression Layouts
Builder Base attackers do not steal resources from your storages. Builder Gold is earned by attacking other bases, while Builder Elixir is earned from defensive results. A progression layout therefore focuses on limiting enemy stars and destruction while your buildings, troops, walls, and Battle Machine are being upgraded.
BH5 Balanced Layouts
Balanced BH5 layouts combine Builder Hall protection, defensive overlap, controlled troop pathing, and protection against different attack directions. They are useful for regular Builder Battles when you want a flexible layout rather than a design focused entirely on one defensive goal.
What Makes Builder Hall 5 Different?
BH5 introduces a major new threat for base builders: the Battle Machine. This ground-based Hero Machine can absorb defensive fire, damage buildings, and support troops as they enter the base. Layouts that worked at BH4 may become less effective if they offer the Battle Machine a clear path toward important defenses or the Builder Hall.
The Battle Machine Unlocks
At BH5, attackers can deploy the Battle Machine to support their army. Avoid placing several important defenses along one simple ground route. Use walls, buildings, and defensive coverage to make the Battle Machine change targets or remain exposed while moving through the base.
The Final Single-Stage Level
BH5 battles still take place on one defensive stage. The second stage does not unlock until Builder Hall 6, so you do not need to divide your buildings between separate areas. Your complete defensive strength should be organized into one connected and carefully protected layout.
How to Defend Against the Battle Machine
The Battle Machine usually creates the most value when it can move between important buildings without taking concentrated defensive damage. Your BH5 layout should make this difficult by using protected defenses, indirect routes, and buildings that influence which target the Hero Machine approaches next.
Avoid Straight Ground Routes
Do not create one open path leading from the edge of the base to the Builder Hall or your strongest defenses. A direct route allows the Battle Machine and supporting troops to remain together while attacking several valuable buildings in sequence.
Protect Important Defenses
Keep important defenses away from easy edge access and place them where nearby defenses can provide support. An exposed defense may be removed before it deals enough damage to the Battle Machine or the troops following it.
Separate the Hero from Support Troops
Use walls and building placement to encourage the Battle Machine and regular troops to choose different targets. When the attacking force separates, defenses can concentrate on smaller groups instead of facing the complete army in one area.
Use Defensive Overlap
Likely Battle Machine routes should pass through the range of more than one defense whenever possible. Overlapping coverage increases the damage received while the Hero Machine is attacking buildings or moving toward its next target.
Choosing the Right BH5 Layout
The best layout for your base depends on the weaknesses shown in your defense log. Review which side attackers choose, which defense they destroy first, and whether the Battle Machine reaches the center too easily. Choose a layout that addresses the repeated problem instead of selecting a design only because it looks compact or symmetrical.
Choose a Compact BH5 Layout When
A compact layout may help when attackers regularly destroy isolated defenses or move through the base without facing concentrated fire. Compact placement improves defensive support, but too much grouping can allow one successful entry to reach several valuable targets.
Choose a Spread BH5 Layout When
A moderately spread layout may help when attackers gain high destruction from tightly grouped buildings. Additional spacing can increase travel time and separate troops, but every important outer building should still remain within useful defensive coverage.
BH5 Wall and Entry-Point Planning
Walls at BH5 should do more than surround the Builder Hall. They should influence where ground troops enter, which building the Battle Machine targets, and how long attackers remain under defensive fire. Review the base from every side and look for openings that provide too much value from one deployment area.
Use Compartments with a Purpose
Create compartments that slow movement and separate important buildings. Avoid wall arrangements that guide attackers directly through the base. Each wall section should either delay troops, protect a defense, or influence their next target.
Avoid Obvious Entrances
A visible opening can become the default entry point for every attacker. When using an opening intentionally, make sure it leads troops toward traps and overlapping defensive fire rather than toward an unprotected central area.
How to Use BH5 Copy Links
Tap an available copy link to open the selected BH5 layout directly in Clash of Clans. Review the base inside the Layout Editor before saving or activating it. Confirm that all required buildings, walls, and traps are placed and that no obstacles prevent the layout from being used.
After copying a layout, compare it with your current building and defense levels. You may need to adjust trap positions, wall openings, or outside structures to match the attacks you face most often. A copied layout should be treated as a strong starting point that can be improved using your own defensive results.
BH5 Layout Review Checklist
- Check Battle Machine routes: make sure there is no direct ground path toward several important defenses or the Builder Hall.
- Protect edge defenses: avoid placing valuable defenses where they can be destroyed before the main attack enters the base.
- Review defensive overlap: likely entry routes should remain covered by multiple defenses whenever possible.
- Inspect wall openings: confirm that openings influence troop movement instead of giving attackers a simple route through the center.
- Check outside buildings: use them to increase travel time, but avoid offering too much easy destruction outside defensive range.
- Review trap locations: traps should be placed along predicted troop routes rather than in random or rarely used areas.
Common BH5 Base-Building Mistakes
- Ignoring the Battle Machine: a layout designed only to stop regular troops may provide the Hero Machine with too much value.
- Creating one open central route: this allows the Battle Machine and supporting troops to move together through several important targets.
- Leaving defenses unsupported: isolated defenses can be removed without exposing attackers to enough return damage.
- Grouping all important buildings: excessive concentration can allow one successful entry to damage a large portion of the base.
- Overprotecting only the Builder Hall: attackers can still gain high destruction by clearing the rest of the base efficiently.
- Changing layouts too quickly: one unsuccessful defense is not enough evidence that the complete design needs to be replaced.
Tips for Builder Hall 5 Progress
- Study Hero pathing: watch where the Battle Machine enters, which targets it selects, and where it receives the least defensive damage.
- Make small adjustments first: moving one building, trap, or wall opening may correct a repeated weakness without replacing the whole base.
- Test several defensive results: judge a layout using repeated attack patterns rather than the result of one unusually strong opponent.
- Balance compactness and spacing: keep defenses close enough to support one another without giving attackers too much grouped value.
- Upgrade the Battle Machine: offensive progression helps you earn Builder Gold and compete more effectively in your own attacks.
- Continue defensive upgrades: good placement improves performance, but severely underleveled defenses and walls will remain easier to overcome.
When Should You Change Your BH5 Layout?
Review several defensive results before replacing your layout. A change may be necessary when attackers repeatedly enter from the same side, use the Battle Machine to remove the same defense first, or reach the Builder Hall through an identical route. Consistent high destruction from one approach usually indicates a structural weakness rather than an isolated strong attack.
Begin by changing the affected section of the base. Reposition a trap, move an outside building, adjust a wall opening, or improve defensive support around the targeted area. Replace the complete layout only when smaller adjustments do not change the repeated attack pattern.
Explore the layouts on this page to choose a BH5 base layout suited to defense, trophy pushing, or regular progression. After activating a new Builder Hall 5 Clash of Clans base, review how attackers use the Battle Machine and adjust your walls, traps, and defensive coverage when the same route succeeds repeatedly.
